Hiking the Havasupai Trail to Havasu Falls, Mooney Falls, Beaver Falls, & The Confluence in Supai, Arizona: How to Get Permits?
Distance (One Way to The Confluence): 16.7 miles / 26.9 km
Elevation Change: ~3,300 ft. (1,006 m)
The Havasupai Trail in the Grand Canyon of northern Arizona is arguably one of the most beautiful backcountry adventures across the Southwest, and it’s a backpacking trip that I often regard as one of my favorite hikes I’ve ever done!
That said, the Havasupai Trail, the reservations, the campground, and everything associated with the adventure make it one of the most exclusive backcountry hikes in the U.S., because of how challenging it is to secure a permit — or, at the very least, to secure one during one of the warmer times of the year.
Nevertheless, I’ve been fortunate to hike the Havasupai Trail many times, which is why I wanted to share everything I know about the adventure, including the best strategy to secure one of these elusive reservations!
How Long is the Havasupai Trail?
Since most hikers only hike as far as Beaver Falls and don’t continue all the way to The Confluence, I’ve broken down each section of the Havasupai Trail to help you plan your adventure.
Havasupai Distances (One Way):
Hualapai Hilltop to Havasu Campground: 10.0 miles (16.1 km)
Havasu Campground to the Top of Mooney Falls: 0.7 miles (1.1 km)
Top of Mooney Falls to the Base of Mooney Falls: 0.1 miles (0.2 km)
Base of Mooney Falls to Beaver Falls: 2.1 miles (3.4 km)
Beaver Falls to The Confluence: 3.8 miles (6.1 km)
Total Distance (One Way): 16.7 miles (26.9 km)
How to Get Havasupai Permits?
The Havasupai Trail is managed by the Havasupai Tribe, not the National Park Service.
Beginning in 2024, the Havasupai Tribe implemented an advanced lottery reservation system, much like lotteries for popular federally-managed destinations on Recreation.gov, such as Mt. Whitney and The Enchantments Traverse.
However, as of 2026, the lottery system and permit transfer board is no longer in place. Instead, it changed to an early access period for permit purchases starting at 8:00 a.m. on January 21, 2026, and ran through January 31, 2026, at 5:00 p.m. (Arizona Time).
What this really meant was that anyone with an active account on the official Havasupai website could purchase campground or lodge permits by paying an additional early access fee of $40 per person for campground reservations and $160 per lodge reservation.
Regarding all those who missed the early access period, there is still the opportunity to claim leftover reservations, which the Havasupai Tribe released to the general public at 8:00 a.m. (Arizona Time) on February 1st.
Considering these options, the Havasupai Tribe has said that interested visitors have the best opportunity to secure a reservation during the early access period, which helps us all avoid the issues of years past, where permits for the 2018 season were completely sold out in less than an hour, and permits for 2019 took around two hours—both due to the website continuously crashing—meaning they otherwise would have sold out in less than a minute.
Book Here: Official Havasupai Reservations
What is the Best Strategy to Book Havasupai Permits?
The best advice I can give is to create an account in advance and be ready to book at 8:00 a.m. (Arizona Time) on January 21, 2026.
That said, I personally think this new early access period is an unfortunate step back, as I suspect it is only going to shift all the traffic that used to flood the site on February 1st to this new date.
My thoughts aside, I’ve always believed that it’s best to not have specific dates in mind—especially holidays or long weekends. Rather, it’s best to have a range of about 2-3 weeks that you’d be okay with going, because specific dates—especially holidays—are never a guarantee.
This is to say, in all but one of my experiences, I never got the exact dates I wanted.
Now, if you missed the early access period or didn’t want to pay the extra fee, the next best scenario is to have everyone in your party logged in and ready to book at 8:00 a.m. (Arizona Time) on February 1st.
Then, when 8 a.m. hits, refresh the website, and don’t be alarmed if the website crashes immediately. The traffic demand can be insane! However, at least with the advanced reservation system, some of the traffic that would otherwise be on the site will be alleviated.
This is all to say that it has always been a struggle to get Havasupai permits—especially for a big group. However, there are little tricks that may help, including booking individually rather than as a big group, using a phone instead of a desktop, and trying different browsers.
With all this in mind, the experience will likely be different for everyone.
Best of luck! ᨒ 🤘🏼
Hualapai Hilltop Trailhead Parking
Parking for the Havasupai Trailhead is located at the Hualapai Hilltop, the trailhead at the very end of a 60-mile (96.6 km) one-way road off Historic Route 66 that begins just outside of Peach Springs.
It is here that the parking lot for the Havasupai Trail will be found, which will most likely be full and crowded during the busy spring, summer, and fall backpacking seasons.
What I mean by this is that almost every night, people are sleeping in their cars and tents, waiting to begin the hike. This is especially true during the hottest times of the year, when it’s safest to hike through the night.
With this in mind, I highly recommended that you don’t drive a large RV, trailer, or any other vehicle similar in size. Parking at the Hualapai Hilltop is already hard enough as it is, and you will only be making it more difficult on yourself and other hikers by doing so.
Driving from I-40 to the Hualapai Hilltop
In order to avoid the worst of the summer heat on the trail, it’s very common for hikers to begin the Havasupai Trail at night, which means the drive to the trailhead will also be in the dark.
I bring this up because the long road off Historic Route 66 is 60 miles (96.6 km) one way, which is in addition to whichever way you get there off of Interstate 40.
This is important to mention because there will be Elk and cattle scattered along the drive, and you cannot count on cell phone service if you were to get into an accident.
Google Maps Directions: Hualapai Hilltop
Southwest Hiking Checklist
Obviously, for camping, you will need general backpacking gear. For this reason, I wrote a separate post about what backpacking gear is worth the money, from my experience, and what the best alternatives are to save you money.
Read My Separate Post: Best Ultralight Backpacking Gear
In addition, here is a complete list of must-have things that you will want for any hike in the Southwest U.S.
Hiking the Havasupai Trail
The Havasupai Trail is an entirely downhill hike, losing about 2,500 ft. (762 m) of elevation from the trailhead to the campground just past Havasu Falls.
That said, the vast majority of the hike shown here is often done in the dark both ways because of how hot the Grand Canyon area in northern Arizona gets from mid-May to mid-September, with temperatures varying quite significantly from the trailhead to The Confluence, as there is about a 3,300-ft. (1,006 m) difference in elevation.
For these reasons, I’ve often begun hiking from the Hualapai Hilltop at around 3:30 a.m. during the summer. However, in these photos from late April, our group began mid-morning because it was much more comfortable out, which inevitably made the first day much more enjoyable because we weren’t as exhausted when we arrived at camp!
Over the course of the first 1.4 miles (2.3 km), the Havasupai Trail descends 13 or 14 switchbacks, depending on how you count, losing about 1,025 ft. (312 m) from the Hualapai Trailhead to the bottom of the most significant hill where the long wash begins.
This is the one hill that most hikers dread on the way out, but, for comparison, this hill is nowhere near as challenging as the Rim-to-Rim Trail in Grand Canyon National Park.
This view is a great visual example of just how far the bottom of the long, initial 1.4-mile (2.3 km) hill is located—past those 'flatter'-looking sections before the red rock at the bottom of the canyon.
Depending on the time of day and time of year, mule teams on the Havasupai Trail can be very common.
Through the middle sections of the descent, the switchbacks become much shorter and more condensed than those at the upper and lower elevations.
This is the bottom of the final switchback, where the Havasupai Trail becomes more gradual, until it reaches the bottom of the hill at the 1.4-mile (2.3 km) mark.
Most hikers typically find this gradual, sloping hill to be much easier—granted that you aren’t climbing up during the day in the midsummer months.
This is roughly where the Havasupai Trail crosses the 1.0-mile (1.6 km) mark, meaning there are only 0.4 miles (0.6 km) left to reach the bottom of the hill and the beginning of the long wash.
When the Havasupai Trail makes this hard turn to the right, the bottom of the initial hill is located just a short distance ahead.
Hualapai Wash
After 1.4 miles (2.3 km), the Havasupai Trail reaches the bottom of the biggest hill on the entire 10.0-mile (16.1 km) hike to the campground, which marks the beginning of the Hualapai Wash.
From this point, the Havasupai Trail continues to descend toward Supai, the Native American village within the canyon, but the elevation change is hardly noticeable.
In fact, the Hualapai Wash continues to descend about 950 ft. (290 m) from this point to the start of Supai Village, but over the next 6.1 miles (9.8 km), this change is very gradual.
At the bottom of the descent, the Havasupai Trail splits several times throughout the course of the wash, but the important thing to remember is that all routes lead to the same place.
It mostly comes down to personal preference—whether you choose a path that is slightly more direct or a route that follows the natural course of the winding wash.
As should be obvious, there is essentially no shade on the Havasupai Trail outside of the early morning, late evening, and overnight hours.
This is why I highly recommend coming prepared with a hooded sun shirt—even if you plan on hiking through the night!
There’s truly no telling how often it will come in handy—especially for the day hikes down to Mooney Falls, Beaver Falls, and The Confluence, if you decide to go that far.
Warning
As the Havasupai Trail moves down the wash, the walls on either side begin to close in.
This is important to mention because flash floods are not uncommon on the Havasupai Trail and the greater Grand Canyon area. Therefore, pay attention while moving through the Hualapai Wash for safe areas where you can seek high ground in case of an emergency.
I have unfortunately experienced one flash flood on one midsummer trip, but fortunately, our group was high enough on the hill, climbing out of the canyon, to avoid the worst of it.
However, high ground—and being the tallest thing around—certainly didn’t help with the lightning risk overhead.
Apart from my thoughts above, the walls of the Hualapai Wash can be a blessing when it comes to avoiding the direct sun during the hottest times of the year.
By this, I mean that, of all my many experiences hiking into Havasupai, our group has always chosen to hike out in the late evening as opposed to on our last day, because the long shadows created by the canyon walls make the uphill hike out much more comfortable.
Hiking out at this time can be especially helpful for those who anticipate moving more slowly out of the canyon—particularly because nothing is worse than starting early in the morning and reaching the switchbacks too late, just as the sun begins to hit the trail.
This is one of many examples where it truly comes down to personal preference regarding which route to follow.
It’s certainly debatable whether every more direct route is actually easier, as some are definitely hillier, while others can make the hike through the wash quicker—if you pick the right ones.
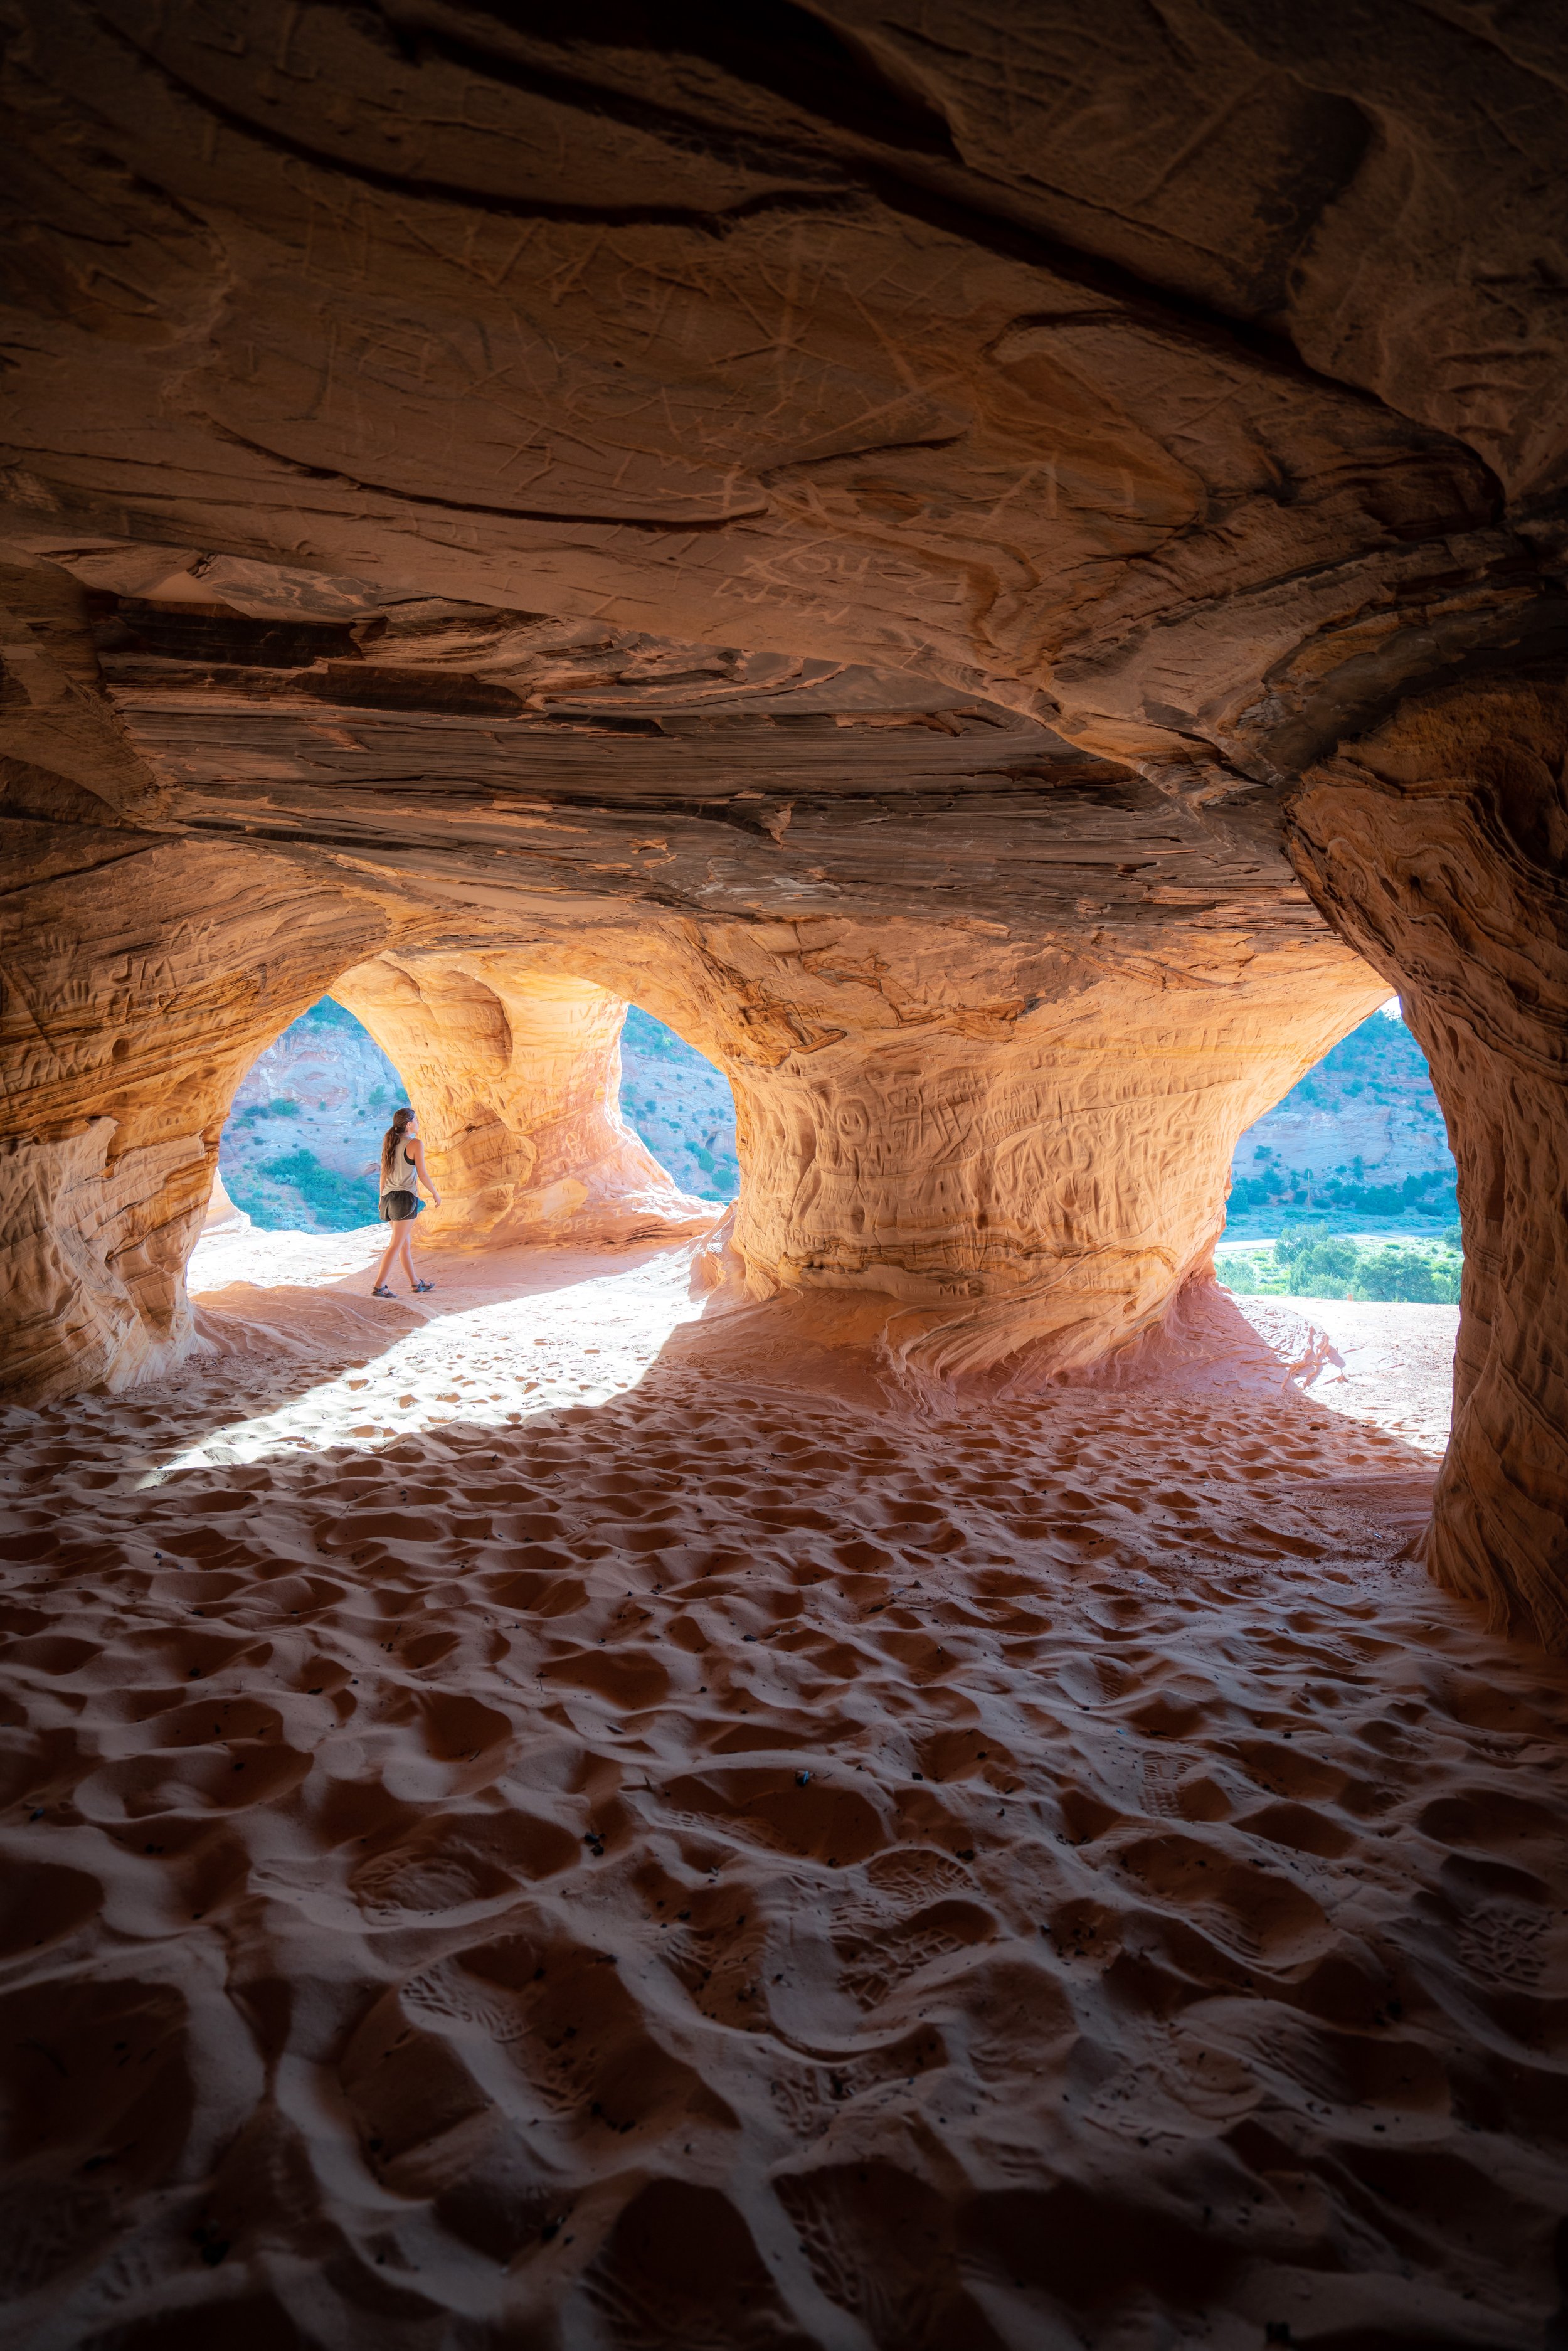
This cave, at around the 3.5-mile (5.6 km) mark, always makes for one of the best places to find shade in the Hualapai Wash.
Again, I cannot stress enough how crucial a hooded sun shirt can be on the Havasupai Trail, which is why I continually mention the importance of buying one throughout this article before making the trip.
This is one of the first Cottonwood trees on the Havasupai Trail, which is always a nice sign that you’re getting closer to Supai and the Havasu Creek, as Cottonwoods are known for thriving next to bodies of water.
That said, this lone tree is still quite some distance from the stream, but they only become more and more frequent the closer the trail gets to Havasu Creek!
This split marks one of the most significant examples where the Havasupai Trail divides.
Here, hikers have the option to take the route to the right, which is the higher, more constructed path, or the trail to the left, which simply follows the natural downward-sloping wash.
I chose to go left, but in either case both routes meet up about 0.25 miles (0.4 km) ahead.
The upper route is located high to the right from where this photo was taken.
After the split shown above, the Havasupai Trail enters some of the narrowest sections of the Hualapai Wash.
If heavy rain is anticipated, it’s important to avoid hiking through these narrow sections of the lower Hualapai Wash
I say this because, unfortunately, hikers have lost their lives due to flash floods on the Havasupai Trail in the past, which is why good decision-making is imperative—especially during the midsummer monsoon season!
With about 0.7 miles (1.1 km) left before the Havasupai Trail reaches Havasu Creek, the trail begins its steepest descent in the Hualapai Wash, as it navigates around several natural waterfalls.
When the far canyon wall becomes visible after the steep section prior, Havasu Creek is closer than ever before!
The Havasupai Trail notably becomes a lot greener the closer it gets to Havasu Creek!
Havasu Creek
When the Havasupai Trail reaches Havasu Creek, the path makes a hard left turn to continue down toward Supai Village.
On a different note, those curious about where the water originates can hike just 0.25 miles (0.4 km) up the creek to the right to find the spring from which all the water flows!
After the turn, the Havasupai Trail parallels Havasu Creek for roughly 0.8 miles (1.3 km) until the start of the village.
On a midsummer hike, getting in the creek on this stretch is always a great feeling!
Once the Havasupai Trail crosses over Havasu Creek, the start of Supai Village is only about 0.3 miles (0.5 km) away.
Supai Village (Supai, Arizona)
After roughly 7.5 miles (12.1 km) of hiking, the Havasupai Trail reaches the beginning of Supai Village, a small town located just before Havasu Falls and the campgrounds that follow.
It is here that hikers can find food to buy (be sure to bring cash), the Havasupai Lodge, a post office, and much more. Simply continue hiking through the village and follow the signs to navigate toward the campground, as everything available for hikers to utilize can be found off this main path.
This long straightaway into Supai is always a nice sign after a long hike to get to this point!
There’s certainly no shortage of fry bread places in Supai, but catching them when they’re open always proves to be the tricky part!
Go right at this split to stay on the Havasupai Trail.
When the signs at the trailhead say that Supai is 8.0 miles (12.9 km) away, that’s truly just an estimation.
In reality, the Havasupai Trail totals about 1.5 miles (2.4 km) through the Supai Village, so it really depends on what part of the village you’re referring to, as it’s not as small as it may initially seem.
This field in the central part of Supai Village is where the helicopters take off and land, and it’s a common place where hikers can be found waiting for their turn to catch a ride out.
At this split, go right again to continue hiking toward Havasu Falls.
As the Havasupai Trail slowly leaves Supai Village, it will begin to pass a number of side trails for Fifty Foot Falls, Little Navajo Falls, and Navajo Falls (Hidden Falls) on the left-hand side.
All three of these typically make for great short day hikes on the second or third day at the campground, as they are much easier to reach than Beaver Falls, located farther down Havasu Canyon.
This final section around Navajo Falls (Hidden Falls) is always a great sign that you’re getting close, as Havasu Falls and the campground are located not far beyond!
This is Navajo Falls, also called Hidden Falls, which can be seen just off the trail.
This split to the left is where hikers can make their way down to Navajo Falls (Hidden Falls).
Havasu Falls
After roughly 9.9 miles (15.9 km) of hiking, the Havasupai Trail finally reaches Havasu Falls—the first of three major waterfalls on the entire hike, and arguably the most iconic!
That said, I personally think that Havasu Falls is best enjoyed and photographed first thing in the morning, as the light hits the water and the Cottonwood trees for the first time!
To get down to Havasu Falls, there are a number of different paths on the right-hand side of the main trail.
Havasu Campground
At 10.0 miles (16.1 km), the Havasupai Trail comes to the beginning of the Havasu Campground, which continues for roughly 0.7 miles (1.1 km) to the cliffs atop of Mooney Falls.
Throughout the campground, campsites can be found along both sides of the creek, with the best sites often considered to be the ones farthest from the busy trail.
Fern Spring
Fern Spring is a relatively 'new' addition in Havasupai, which is nothing more than a PVC pipe tapped into a natural spring that hikers can use for drinking water.
While some groups were skeptical about drinking from it directly, I can say that our entire group drank from it—unfiltered and untreated—and we did not get sick.
Campsites like these are certainly less desirable compared to ones farther away from the main Havasupai Trail.
The one thing to remember about camping in the Grand Canyon is to pack a stuff sack and parachute cord for proper food storage—the same as you would for a bear bag.
This is for the squirrels, which are notorious for stealing food and ruining gear just to get to whatever they see as food—even if it’s just something like toothpaste!
Throughout Havasu Campground, a number of restrooms can be found, which is why the walk to reach one is usually not an issue, no matter where you choose to set up camp.
Havasu Campground to Mooney Falls
The end of Havasu Campground is the top of Mooney Falls.
This is where the iconic cave network and downclimb to Mooney Falls begins, which drops about 175 ft. (53 m) in just 0.1 miles (0.2 km).
That said, the traffic jam on the way down to Mooney Falls is very real, which is why one of the biggest benefits of being the first group to leave camp is getting down the climb early-especially if you plan to hike all the way to The Confluence!
Upon beginning the steep descent, the Havasupai Trail will wind its way down these initial sections toward the first cave.
First Cave
This is the first of two caves to pass through to reach Mooney Falls, with both being about the same length.
This is also where the traffic jam down to Mooney Falls typically begins, but if there are particularly slow groups making their way down, lines can—and often do—extend up to the first signs for Mooney Falls above.
All this to say, it’s not uncommon for hikers to have to wait 30 minutes to descend this very short but steep section to Mooney Falls, but in the worst scenarios, hikers have been stuck in this bottleneck for 1–2 hours!
This, again, is why being the first group out of camp in the morning is important if you want to avoid getting stuck.
Second Cave
This is the second Mooney Falls cave, which, in my opinion, is the prettier of the two once on the far side!
The lower side of the second cave is where the steepest sections of the descent are found.
It is here, among these ladders and chains, that the long line of traffic is almost always created—often beginning shortly after sunrise and continuing throughout much of the morning.
As the steep downclimb moves closer to the bottom of Mooney Falls, the trail enters an area of constant mist from the waterfall.
These wet sections certainly do not help the traffic move any faster, but if there’s one thing to consider, try to let others pass if it’s safe to do so.
I can speak from experience: it’s certainly no fun sitting in the mist for a long time because the line is not moving—especially during the colder times of the year!
Mooney Falls
At the bottom of the steep 175-ft. (53 m) downclimb, hikers reach base of the 200-ft. (61 m) Mooney Falls and the start of the Havasupai Trail to Beaver Falls.
Mooney Falls to Beaver Falls
Past Mooney Falls, the Havasupai Trail continues on the left side of the stream for another 2.1 miles (3.4 km), crossing Havasu Creek three separate times along the way.
After leaving Mooney Falls, the Havasupai Trail to Beaver Falls will split a handful of times, but know that all paths lead to the same place.
As long as you’re hiking downstream, the various routes will eventually merge into the most commonly used path to get to Beaver Falls.
During the midsummer months, the these pools between Mooney and Beaver Falls make for great spots to cool off from the heat!
This California Redbud tree is certainly a notable mention, because it was not only one of the few I noticed on the Beaver Falls Trail, but also, if you’ve ever seen one bloom, they resemble something of a desert Cherry Blossom!
However, that really takes catching it early enough in the season to see—which, at these lower elevations, was certainly not the case by late April.
First Havasu Creek Crossing
Between Mooney and Beaver Falls, there are three separate stream crossings along the way.
That said, I highly recommend embracing the cold water right away, because there’s truly not one crossing where there’s an option to stay out of the water.
If you’ve ever been told there’s a shortcut on the hike to Beaver Falls, I might be the first to say that rumor isn’t true.
However, between the first and second Havasu Creek crossings, there is one faster route to follow that avoids the majority of the hills shown here. This is commonly where the misconception of a shortcut comes from—especially when one of the locals passes a group of visitors hiking between Mooney and Beaver Falls.
In any case, all routes will lead to the same place, and as long as your group finds the second crossing, you’re on the correct path!
Second Havasu Creek Crossing
The first and second stream crossings are located within a very short distance of one another, meaning that once the Havasupai Trail crosses the third, Beaver Falls is not far beyond!
After the second Havasu Creek crossing, the Havasupai Trail to Beaver Falls becomes much more straightforward as it follows one main path along the south (left) side of the stream.
This long path along the left side of Havasu Creek is notorious for its seemingly endless sea of wild grapevines that parallel the trail.
That said, the fruits are considered safe to eat, but they are definitely not something I recommend, since they do not taste like the stereotypical grapes we all know and love.
This split is another example where both routes lead to the same place shortly ahead, meaning it’s more or less personal preference regarding which route to take.
This sea of grapevines can be a very beautiful place to take photos in the right light!
The far canyon wall in the distance is a good visual indicator of how much farther there is to hike to Beaver Falls, as the waterfall is located just before this sharp bend in the creek.
This bridge over the steep ravine hasn’t changed much over the years, so be sure to take your time.
The drop is steeper than it may initially appear!
As another reminder, be sure to bring a hooded sun shirt, which will almost certainly come in handy at some point on the hike to and from Beaver Falls!
Be sure to keep an eye out for Bighorn Sheep between Mooney and Beaver Falls, as I have almost always seen them below the campground, where there are fewer people!
Regardless of which path you decide to take, both routes lead to the third Havasu Creek crossing shortly ahead.
Third Havasu Creek Crossing
This is the third and final Havasu Creek crossing before Beaver Falls, and it’s notably after this that the Havasupai Trail begins climbing another series of cliffs and ladders, navigating the final sections over to Beaver Falls.
At this split, it doesn’t matter which route you decide to take, as both paths lead to the ladder that climbs up to the start of the cliffs just ahead.
This drop down to Palm Tree Cave is one of the steepest, outside of the downclimb to Mooney Falls.
Palm Tree Cave
These seemingly out-of-place palms are what hikers call 'Palm Tree Cave,' which serves as a notable landmark on the steep climb up the cliffs to Beaver Falls.
This initial ladder has looked different over the years, but, in any case, this is where the steep climb up and over to Beaver Falls begins!
This is the view looking back down.
At the top of the climb, the Havasupai Trail levels out significantly as it makes its way over to Beaver Falls and the downclimb to get there—about 0.2 miles (0.3 km) ahead.
Shortly before the downclimb, Beaver Falls can be seen from above for the first time!
Beaver Falls-Confluence Junction
This is where the Havasupai Trail splits, with the path to the left that leads down to Beaver Falls, and the path to the right that continues on to The Confluence and the Grand Canyon National Park border.
Beaver Falls Trail
This is the short but steep 0.1-mile (0.2 km) downclimb to Beaver Falls.
Beaver Falls
After a somewhat tedious 2.1-mile (3.4 km) hike down Havasu Canyon, the Havasupai Trail reaches Beaver Falls—a beautiful, multi-tiered waterfall that is a favorite spot for hanging out on a hot summer day.
However, in order to get the best photos of Beaver Falls, it’s widely accepted that first thing in the morning is the best time.
First thing in the morning avoids the crowds that make their way down by mid-morning, and it avoids the harsh light, making a long exposure like this easier to capture!
Beaver Falls-Confluence Junction
To continue past Beaver Falls to The Confluence at the Colorado River, go right at this junction to stay high on the cliff.
Now, it must be said that the hike from Beaver Falls to The Confluence should not be compared to the hike from Mooney Falls to Beaver Falls.
It is a bit more difficult, longer, and more tedious—not to mention that very few hikers who make their way to Beaver Falls continue on to The Confluence, as it ends up being a very long day that often immediately follows the initial 10.0-mile (16.1 km) hike into camp on day one.
This is because hiking to The Confluence on the second day allows for one full rest day before hiking out after the third night, as opposed to going back-to-back with The Confluence on the third day and the long hike out on the fourth.
In any case, I highly recommend leaving camp early to hike to The Confluence because, even with an early start not long after sunrise, I can almost always guarantee that you’ll make it back above Mooney Falls by late afternoon or early evening.
Beaver Falls to the Confluence
Following the Beaver Falls junction, the Havasupai Trail to The Confluence remains high on the cliff, before reaching the steep downclimb just around the bend.
Grand Canyon National Park
Shortly after Beaver Falls, the Havasupai Trail leaves the reservation and enters Grand Canyon National Park.
This is important to mention because, from this point to the Colorado River and beyond, all National Park regulations apply—including the continued no-drone policy.
Upon rounding the bend, the Havasupai Trail begins a steep and narrow descent, leading down to the creek about 100 ft. (30.5 m) below.
First Havasu Creek Crossing
On the hike back, finding the exact point where the Havasupai Trail crosses Havasu Creek can be a little tricky.
Therefore, I highly recommend dropping a pin or making a mental note of something, because it’s not uncommon to hike right past this crossing when returning.
The Havasupai Trail will navigate a number of different sections just like this, which is why I again recommend embracing the cold water—especially because there is one unavoidable deep section that hikers must navigate to reach The Confluence near the end.
During the midsummer months, these sections are actually kind of a blessing, largely because hiking to The Confluence inevitably means spending a lot of time in the sun!
This sharp bend to the west is always a nice sign that you’re getting close to the climb back up to Beaver Falls on the hike back!
Second Havasu Creek Crossing
This makes the second of five times the Havasupai Trail crosses Havasu Creek after Beaver Falls, not including the times that hikers are required to get into the stream while remaining on the same side of the canyon.
It’s pretty cool how narrow Havasu Canyon gets after the sharp bend above!
Third Havasu Creek Crossing
This is the third time the trail crosses Havasu Creek, but it doesn’t stay on the left side for long, before it switches back to the right side again.
Fourth Havasu Creek Crossing
The fourth creek crossing is one of the most significant because it proved to be the trickiest one to find an easy place to cross the strong current.
However, once on the right side, the Havasupai Trail stays there for the majority of the remaining trail, apart from the very last stretch before The Confluence.
This long stretch down the right side of Havasu Canyon is nice, because it moves much faster than the sections across and along the creek prior.
I’ll say it again and again: come to Havasupai with a hooded sun shirt—especially if you plan to hike to Beaver Falls and The Confluence!
The next two sharp bends in the canyon are a good sign that The Confluence is near—just beyond the second bend, where Havasu Creek turns back to the west.
Finally, after rounding the second bend, the canyon wall on the other side of the Colorado River becomes visible for the first time!
This is the wall straight ahead in the photos below!
It’s fairly common to miss this cave and instead scramble above it before realizing that going up is not the correct route.
This short stretch, just past the cave along the right side of the canyon, is the deepest section of Havasu Creek, where there is truly no way to avoid getting wet.
For this reason, and for the countless other crossings on the Havasupai Trail, I highly recommend hiking in with one of the dry bags linked below. They may not keep your entire bag dry if you slip, but at the very least, your valuables can be protected.
After the cave and the section through the creek, the Havasupai Trail continues up and over this steep scramble, before reaching the final crossing shortly ahead.
Fifth Havasu Creek Crossing
This is the fifth and final stream crossing, where the Havasupai Trail continues from here to The Confluence high above Havasu Creek on the south side of the canyon.
Havasu Creek-Colorado River Confluence
After a long and tedious 3.8-mile (6.1 km) hike down Havasu Canyon, the Havasupai Trail finally comes to an end where Havasu Creek meets the Colorado River in Grand Canyon National Park.
Personally speaking, I think the hike down to The Confluence is absolutely worth the effort, as I believe it’s even more beautiful than Beaver Falls!
However, that’s not to say the hike from Beaver Falls to The Confluence is for everyone, as the entirety of the adventure from the Hualapai Hilltop to The Confluence makes for a very long and slow 16.7-mile (26.9 km) one-way journey, which inevitably has to be retraced after spending just a little bit of time at this incredibly remote destination!
Nevertheless, The Confluence is an amazing experience, and we were even lucky on this day to catch a group rafting the entirety of the Colorado River on a 1- to 2-week-long excursion!
To learn more about similar adventures offered, checkout the tours linked below.
Hiking Out of Havasupai
Just like hiking in, when to hike out should depend entirely on the time of year you’re visiting the Grand Canyon—meaning from mid-May to mid-September, it’s best to avoid hiking in the direct sun, especially on the switchbacks!
That said, thankfully, shadows come quickly in the canyon, which is why late afternoon exits are not uncommon. This also avoids one more night on the ground if you decide to leave in the afternoon of your third day.
Of all the times I’ve visited, mid to late afternoon is exactly when our group left, which gave us plenty of daylight to hike out during the longest days of the year.
As for the hike out, I think it’s best to break it up mentally into three sections.
First, there is the initial hill out of camp and into Supai Village. Second, there is the long Hualapai Wash following Havasu Creek, and finally, there is the hill and the switchbacks to the trailhead, which cover the remaining 1.4 miles (2.3 km).
This is generally the most dreaded part, but as previously mentioned, this climb is nowhere near as bad as hiking out of the Grand Canyon on the Rim-to-Rim corridor. However, this iconic orange flashing light can either be a sign of hope or a dreaded reality, depending on how high up the hill you first notice it!
10 Things to Know Before Visiting Havasupai
After many experiences on the Havasupai Trail, I realize that this hike is unlike most backpacking trips in the U.S., and I don’t say this because of the climate.
What I mean is that Havasupai has the unique trait of attracting countless first-time backpackers who want to undertake this one-of-a-kind journey, with no backpacking or outdoor experience otherwise.
It’s not hard to see why, but that’s exactly why I wanted to create this list below to answer some of the most common questions.
1. Are there Bathrooms at Havasupai?
Yes, there are bathrooms provided by the reservation, which are located at the trailhead and throughout the campground.
There is no need to bring a cathole shovel, but I recommend bringing a travel-sized hand sanitizer.
2. How to Pack/ What Type of Food to Bring to Havasupai?
For most experienced backpackers, this answer probably seems obvious.
However, there have been more than a few bad actors over the years; hence the list of contraband implemented by the Havasupai Tribe.
That said, pack for Havasupai like you would for any 20+ mile (32.2 km) backpacking trip. I’ve outlined a few more need-to-know specifics below, but countless irresponsible permit holders have hiked in with ridiculous food items that have led to mounds of trash (more on this later), such as cans of soup, Gatorade, bags of chips—and this doesn’t even mention all the coolers and other absurd items hikers have brought in over the years!
Therefore, consider things like freeze-dried meals and other just-add-water alternatives, such as instant ramen, packet oatmeal, or my personal favorite: Mama Pho (link below).
All this goes without saying, food and any other items—such as sunscreen, toothpaste, etc.— needs to be kept away from the squirrels! I’ll talk more about this later.
3. What is the Best Time of Day to Take Photos in Havasupai?
This varies waterfall by waterfall, with slight variations among the seasons, but for the most beautiful photos at each, use the list below.
Havasu Falls – Havasu Falls is best first thing in the morning when the sun starts to hit the turquoise-blue pool and the Cottonwood trees for the first time. This allows for the best light, both from the trail above and down by the waterfall.
In addition, the Milky Way rises directly over Havasu Falls throughout the warmer months, which can make for some stunning, one-of-a-kind shots—if your permit is at the right time of the year!
Mooney Falls – Mooney Falls is best shot in the early to mid-afternoon hours because the cliffs surrounding the waterfall cast long shadows for much of the morning, and they tend to creep up quick in the evening.
However, early to mid-afternoon allows for the beautiful turquoise-blue water at the bottom to light up in the sun, as well as a great mix of shadows depending on when you visit. This typically aligns best with the hike back from Beaver Falls.
Beaver Falls – Beaver Falls is best first thing in the morning. Long exposure photos of all three tiers is a classic, beautiful shot at Beaver Falls, but to achieve this with the best light and minimal, if any, other people in the way, being the first group there is ideal for taking photos.
The Confluence – The Confluence is best at midday when the sun is highest. The narrow canyon just before the Colorado River is easily one of the most beautiful sections of the entire Havasu Creek, but both before and after midday, shadows can block the best colors at The Confluence.
Therefore, I highly recommend leaving early from camp with the goal of reaching The Confluence as close to noon as possible!
Fifty Foot Falls, Little Navajo Falls, and Navajo Falls (Hidden Falls) – All three of the waterfalls above Havasu Falls are best visited late in the morning but before noon.
The adjacent canyon walls are steep here, which block much of the early morning light. However, when the sun finally reaches this portion of the canyon, the waterfalls light up quickly, making the ideal window for photos relatively short.
4. Should I Bring a Hammock or Tent to Havasupai?
While a hammock can be great when the weather is nice during the summer, don’t count on it for the off chance of rain—especially during the monsoon season!
That said, there are a ton of trees throughout the campgrounds that make for a great place to relax in a hammock in the shade, so I think it’s a smart thing to pack—even if you plan on sleeping in a tent.
5. Should You Use Water Filter or Iodine Tablets in Havasupai?
With the 'new' installation of Fern Spring, packing a water filter is certainly up for debate, but again, I can confidently say that our group used it on this hike without any issue.
However, if you don’t want to trust it, a water filter is vital in Havasupai.
6. How to Store Food in Havasupai?
You might be wondering why you need to consider food storage in Havasupai, but this may be the most important thing to know on this list!
A 50-ft. (15.2 m) utility cord and a 30L REI Durable Stuff Sack are a must! If you leave a bag with food on the ground, on a picnic table, or in your tent, the squirrels will chew a hole through it in less than a minute.
Think about your expensive camping gear and the food you need while you’re down there, and be aware that the squirrels in Havasupai are as bad or worse than marmots in the mountains!
7. How Bad is the Trash in Havasupai?
From the trailhead at the Hualapai Hilltop to Beaver Falls, trash is a major problem throughout the Havasupai Trail. Please pack out whatever you pack in.
I noticed a stark increase in the amount of trash left by hikers between my first year and second year at Havasupai, which ultimately gets left up to the reservation and their limited resources to take care of.
It was on this second trip that I spent about two hours collecting trash in bags that I found near the bathrooms, which amounted to 4 large black trash bags completely full by the time I was done.
Again, please do your part!
8. When is the Monsoon Season in the Grand Canyon?
In northern Arizona, the monsoon season officially begins in the middle of June and runs through the end of September, with more more typical monsoonal weather occurring in July and August.
That said, always check the weather before you hike during the summer, and know that the tribe may close the Havasupai Trail any time if the area floods because of a monsoon.
This is not as uncommon as you might think.
9. What to Expect in a Grand Canyon Monsoon?
On my second trip, as we were beginning the climb out of the Hualapai Canyon, lightning started to flash overhead. It was pitch black out, but when the lightning would flash, it would light up the canyon as if it were daytime for just a moment. This was very eerie, and unfortunately, I felt as if we were the tallest objects around because there were obviously no buildings or trees.
This lightning was followed by some of the heaviest rains you could possibly imagine, leaving us soaked and muddy when we finally got back to the car. However, I’d say we were fairly lucky to have been leaving, as I always wondered how bad it must have been down the wash and in the campground.
There are unfortunate, tragic stories of hikers getting swept away when the creek swells, which often means most tents and other belongings are as good as gone as well.
10. What is the Best Time to Begin the Havasupai Trail?
My last piece of advice aligns with the main point I’ve been emphasizing throughout this article, which is to hike in the dark if you’re visiting during the hot summer months (mid-May to mid-September)!
The dangers of the hot summer months certainly cannot be overstated, as there is no water to be found on the Havasupai Trail from the Hualapai Hilltop to Havasu Creek.
That said, you may want to start hiking when the sun is out during the very early and late season. However, this changes dramatically during the hotter summer months, where you will want to begin your hike in the very early morning hours to avoid the heat of the day.
Arizona


Utah